5 Ways SmartKIT Speeds Up Low-Voltage AV Installs


A deeper look at how pre-kitting turns time sinks into schedule gains
If you’ve ever spent the first hour on site sorting pallets, hunting down the right connector, or walking back to the truck for labels, you know the hidden tax of “organizing in the field.” That time adds up—and it’s usually your most expensive time because it’s spent by skilled techs under schedule pressure.
SmartKIT from Windy City Wire (WCW) flips the script. We pre-package, label, and stage your install kits so crews can open the box and start pulling. And with the WCW SmartKIT Portal, you can build, standardize, and manage those kits 24/7—so kitting becomes part of your process, not a one-off.
Quick action: Log into the WCW SmartKIT Portal to build your first kit template by zone or system. Don’t have access yet? Ask your WCW about creating an account.
Below are five ways SmartKIT saves time—from pre-organization and smoother pulls to faster setup—plus practical examples, implementation tips, and where the Portal fits into each step.
1) Pre-organized by zone, room, or phase—so staging time disappears
Traditional approach:
-
Mixed materials arrive in bulk.
-
Foreman or lead tech spends 45–90 minutes each morning sorting, relabeling, and staging.
-
Crews start late, and momentum stalls when something is missing.
SmartKIT approach:
-
Kits arrive organized the way you build: by floor, zone, room, system, or phase (rough-in, trim, test).
-
Each kit is clearly labeled with location, device count, and intended phase.
-
Pull lists and simple checklists live inside the kit, so the next action is obvious.
Why it matters:
-
Decision latency disappears. Instead of asking “What’s next?” crews open the kit and go.
-
Double-handling of material is eliminated. You touch each part once—when you install it.
-
Hand-offs between subcontractors and phases become predictable because the kit defines what “done” looks like for that area.
Example:
-
Four-tech crew on a mid-rise MDU spends 60 minutes daily on staging and re-sorting. Over a 10-day rough-in, that’s 40 crew-hours—half a week of a tech’s time—reclaimed by SmartKIT’s pre-organization.
Portal tip:
-
Create reusable templates by area and phase in the SmartKIT Portal. Mirror your plan naming (e.g., “L3-East-301–320-Rough”). Clone templates across floors with one click and adjust device counts before checkout.
Implementation tips:
-
Choose your kit indexing (e.g., “Level 3 – East Wing – Rooms 301–320 – Rough-In”).
-
Mirror your plan set naming convention on every kit label.
-
Keep kit size manageable: “one lift’s worth” or “half-day’s labor” is a good rule of thumb.
2) Smoother, faster pulls with purpose-built packaging and labeling
Clean pulls are fast pulls. Kinks, tangles, and misroutes don’t just slow you down—they ripple into rework, coordination conflicts, and delays for other trades.
What SmartKIT optimizes:
-
Packaging that pays off cleanly to reduce tangles and snags.
-
Cable labeling aligned to your plan/device IDs for immediate routing.
-
Sequential footage markings that make on-the-fly measuring simple and reduce waste.
-
Bundled runs or pre-cut lengths grouped by your run schedule, so techs aren’t stopping to measure and recut.
Time savings you’ll feel:
-
Fewer stops mid-run to fix tangles or look up destinations.
-
Faster wayfinding with consistent labels that match drawings.
-
Less waste from over-pulling and trimming because footage is tracked and lengths are managed.
Portal tip:
-
In the SmartKIT Portal, attach run schedules or notes to each kit (destination, path callouts, ceiling type). Keep instructions consistent across kits and store them with the template for future projects.
Pro move:
-
Pair SmartKIT with a simple “run card” taped inside the lid: destination, path notes, ceiling type, expected length, and test standard. The crew never needs to leave the pull to check a plan set.
3) Faster device setup and terminations—everything you need in one box
The most common termination delays come from small mismatches: the wrong keystone style, missing faceplates, incorrect patch cord lengths. Each “quick trip” to find the right part costs minutes, breaks flow, and introduces error.
How SmartKIT accelerates trim and test:
-
Connectors, jacks, faceplates, and fasteners kitted with the correct cable type.
-
Hardware pre-sorted by location or device (e.g., “Cam-2 North Dock” or “IDF-1 Patch Panel Row A”).
-
Label sets that match your drawings and as-builts, so terminations are documented as they’re made.
-
Optional inclusion of consumables—Velcro ties, anchors, bushings—so techs don’t stop to restock.
Quality benefits:
-
Fewer field substitutions reduce inconsistent performance and callbacks.
-
Consistent labeling from cable to device to rack streamlines testing and handover.
-
Newer techs onboard faster because the kit guides the work sequence.
Portal tip:
-
Use the Portal’s kit builder to associate the right accessories with each cable type and set default quantities per device. Save “Termination Packs” (e.g., 2x keystones + 1x 2-gang plate + screws) to add consistently with a click.
Example:
-
Access control trim on 20 doors: traditional process lost 3–5 minutes per door chasing specific screws, plates, or labels—roughly 1–1.5 crew-hours saved simply by having correctly matched hardware and label sets inside each SmartKIT.
4) Less rework and fewer mistakes through clear, consistent documentation
Every job succeeds or struggles on documentation. Kitting is the bridge between your BOM and the real-world build.
What SmartKIT brings to documentation and QA:
-
A packing list per kit with quantities, part numbers, and intended locations.
-
A label map that ties back to plan pages and device schedules.
-
Alignment with your naming convention across labels, cable IDs, and device tags.
-
Clear kit-level “done” criteria—rough-in complete, terminations complete, test complete.
Why this reduces errors:
-
Ambiguity is removed. Techs don’t guess, and rework drops.
-
As-builts practically build themselves, since IDs and labels are consistent from the start.
-
Subcontractors and new hires ramp faster with fewer one-off instructions.
Portal tip:
-
Store your labeling standard in the SmartKIT Portal and attach it to each kit template. Keep your packing list and label map with the kit record for easy download and handoff to crews.
QA boost:
-
Add a mini “first-article” checklist to the first kit of each device type or area. Once approved, the rest of the kits replicate the standard—no reinventing or drifting from spec.
5) Leaner inventory, easier job costing, and less schedule risk
Material control is time control. When you right-size inventory to the area and phase, jobs move cleaner and financials get clearer.
Operational advantages:
-
Order exactly what each zone needs—no more overbuying “just in case.”
-
Serialized kit IDs make replenishment straightforward if scope shifts.
-
Simpler returns and warranty tracking by kit rather than by mixed pallets.
-
Cleaner T&M support with a clear record of what was used where and when.
Financial gains:
-
Less waste from overcuts, lost parts, and “break a bulk box to get one item.”
-
Tighter job costing because kit-level consumption maps to area-level progress.
-
Fewer emergency supply runs—often 30–60 minutes each when you factor in site exit, purchase, and re-entry.
Schedule risk reduction:
-
If a GC resequences areas, kits can be re-allocated quickly without deconstructing bulk material.
-
Remobilization is faster: unopened kits move intact to the new sequence.
-
Weather or access delays impact fewer open streams of work, because the “unit of work” is the kit.
Portal tip:
-
Track kit status in the SmartKIT Portal—planned, approved, in-build, shipped. When scope changes, duplicate and edit a kit rather than rebuilding from scratch. Reorder from history with one click.
Before vs. After: A day on site
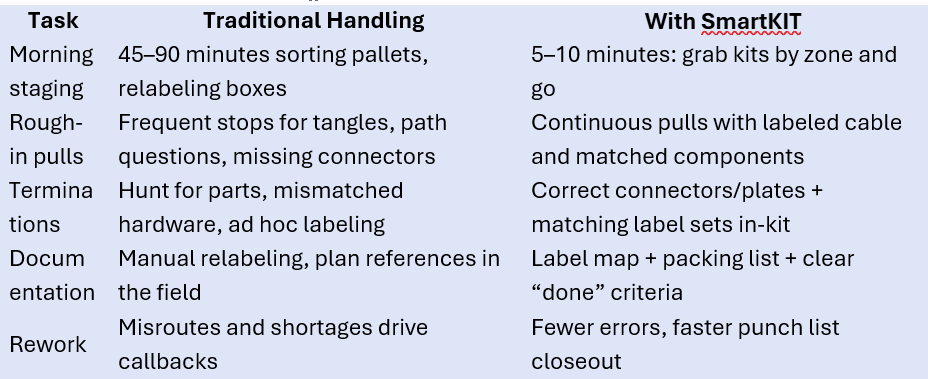
Multiply those savings by every zone, every floor, every crew—and the hours add up quickly.
Try it now: Build one “pilot” kit in the WCW SmartKIT Portal for an upcoming area. Use it to validate your labeling, parts list, and checklists before cloning it across the job.
What can go into a SmartKIT?
We tailor every kit to your scope, standards, and preferences. Common contents include:
-
Low-voltage cable by system or device (camera drops, APs, access doors, panels, AV, intercom)
-
Connectors, keystones, faceplates, surface boxes, patch cords, and fasteners matched to cable type
-
Label sets aligned to your naming convention and plan sheets
-
Consumables (Velcro, zip ties, anchors, bushings, nail plates) sized for the area
-
Pull lists, kit packing lists, quick-reference label maps, and optional checklists for rough-in, trim, and test
Portal tip:
-
Configure your default kit contents and save them as templates in the SmartKIT Portal. Standardize across branches and crews so every project starts from a proven baseline.
Real-world impact: a quick model
Consider a 100-camera distribution center:
-
Traditional process: 4 techs x 10 days. Average 60 minutes/day/tech lost to staging, 20 minutes/day/tech to part hunting, and 10% of runs need rework due to misroutes or labeling gaps.
-
With SmartKIT: Staging drops to 10 minutes/day for the crew. Part hunting is near-zero. Rework cut by half.
Net effect (conservative):
-
4–6 crew-hours saved per day across the team.
-
32–48 crew-hours saved over a two-week window.
-
At blended labor rates, that’s thousands saved—and you finish days sooner, freeing capacity for the next project.
Your exact results will vary by scope, complexity, and crew experience, but the pattern is consistent: fewer decisions and fewer stops equal faster installs.
Common questions and quick answers
-
Will kitting slow down purchasing?
No—kitting clarifies purchasing. We map your BOM to kits and reduce change pain by addressing it at the kit level.
-
What if the GC resequences areas?
Kits are modular. Unopened kits reassign cleanly to the new sequence.
-
How do we handle scope changes midstream?
Because each kit is serialized and documented, we can replenish or adjust by kit instead of unraveling bulk orders.
-
Will new techs understand the system?
Yes. The kit itself functions as a job aid. Many teams report faster onboarding because the work is pre-defined.
Portal tip:
-
Use the Portal to maintain version-controlled kit templates. When standards evolve, update once and apply changes forward—no need to rework in the field.
Implementation playbook: how to roll out SmartKIT successfully
-
Share your plans and device schedule
-
Provide BOM, drawings, label/naming standards, and sequencing constraints.
-
Choose your kitting strategy
-
By zone/room/system/phase. Keep each kit to a half-day’s labor where practical.
-
Build templates in the WCW SmartKIT Portal
-
Set naming conventions, add default contents, attach checklists, and save for reuse.
-
Pilot on a defined scope
-
Try a floor, a wing, or one system (e.g., access control) to validate flow and make tweaks.
-
Standardize and scale
-
Lock in the kit template for future jobs and multi-site rollouts to gain repeatable speed and quality.
Get started: Log into the WCW SmartKIT Portal to create your first project and kit templates. Need a walkthrough? Your WCW rep can set up a quick training session.
Why installers and integrators choose SmartKIT
-
Faster ramp-up for new techs and subs
-
Less material waste and fewer emergency runs
-
Cleaner documentation for closeout and service
-
Predictable, repeatable installs across projects and teams
-
Better coordination with GCs through clear, modular scopes of work
-
Centralized kit management via the WCW SmartKIT Portal
Ready to take chaos out of material handling?
Two quick paths:
-
Sign in to the WCW SmartKIT Portal to build a pilot kit for your next job.
-
Or contact your Windy City Wire rep to request Portal access and a sample kit layout.
Looking for deeper AV guidance? Visit Windy City Wire’s AV Resource Center for practical guides, tools, and best practices to plan, pull, terminate, and document AV installs more efficiently. Explore now: https://windycitywire.com/resource-center/av
We’ll help you turn staging, pulling, and trimming into a competitive advantage—job after job.
